RTA cabinet assembly instructions are often provided in PDF format. These instructions can be found on the manufacturer’s website, or they may be included with the cabinet purchase. They typically provide detailed step-by-step instructions with illustrations or diagrams, making the assembly process easier. The PDF format allows for easy printing and reference during the assembly process.
Introduction
Ready-to-assemble (RTA) cabinets have gained immense popularity as a cost-effective and convenient alternative to custom cabinetry. These cabinets arrive in flat-pack form, offering the advantage of affordability and flexibility in design. RTA cabinets are typically constructed from quality materials and come with detailed instructions to guide you through the assembly process. This comprehensive guide will delve into the world of RTA cabinet assembly instructions, particularly those in PDF format. We’ll explore the importance of preparation, provide a step-by-step guide, and offer valuable tips to ensure a successful assembly experience. Whether you’re a seasoned DIY enthusiast or a first-timer embarking on a kitchen renovation, our guide will equip you with the knowledge and confidence to assemble your RTA cabinets with ease.
Importance of Preparing for Delivery
Before your RTA cabinets arrive, taking the time to prepare for their delivery is crucial for a smooth and hassle-free assembly experience. A little planning can prevent unexpected delays or issues, ensuring you’re ready to tackle the assembly process with confidence. Start by familiarizing yourself with any special delivery instructions provided by the manufacturer. This might include details about the delivery timeframe, required access for the delivery truck, or any specific handling requirements for the cabinets. Next, designate a suitable workspace for unpacking and assembling the cabinets. Choose a large, open area with a smooth, scratch-resistant surface, ideally free from obstructions. Having a well-lit workspace will also enhance visibility and accuracy during assembly. If you’re working on a non-carpeted surface, consider using a large beach towel or blanket to protect the cabinet panels from scratches. Finally, gather the necessary tools before the cabinets arrive. This will ensure you have everything you need on hand to begin assembling your cabinets promptly and efficiently. With proper preparation, you’ll set the stage for a successful and enjoyable RTA cabinet assembly experience.
RTA Cabinet Assembly Instructions⁚ Getting Started
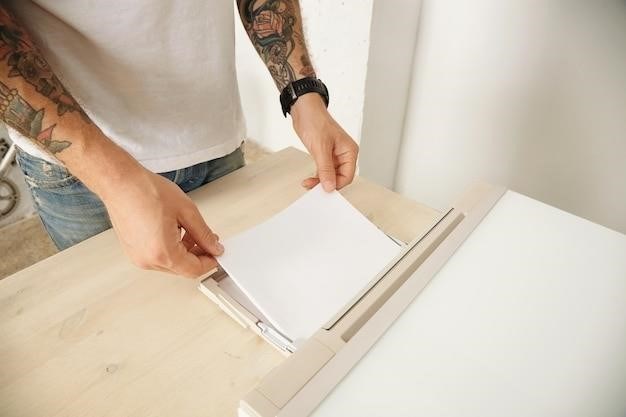
Once your RTA cabinets have arrived and you’ve prepped your workspace, it’s time to dive into the assembly process. Begin by carefully unpacking the boxes, taking care to avoid any damage to the cabinet components. It’s a good idea to inspect each panel and piece for any visible defects or imperfections before you start assembling. Next, familiarize yourself with the assembly instructions. RTA cabinets typically come with detailed instructions, often in PDF format, that guide you through the assembly process step-by-step. These instructions often include diagrams or illustrations for clarity. Take the time to review the instructions thoroughly before beginning assembly, ensuring you understand each step and the required hardware. It’s also helpful to gather all the necessary tools, such as a screwdriver, drill, tape measure, and level, before you start. Having everything readily available will make the assembly process smoother and more efficient. Remember to work in a well-lit area for optimal visibility and accuracy. With these initial steps completed, you’re ready to embark on assembling your RTA cabinets.
RTA Cabinet Assembly Instructions⁚ Step-by-Step Guide
The step-by-step guide in your RTA cabinet assembly instructions is your roadmap to success. It will outline each stage of the process, from joining the cabinet sides and back panels to attaching the shelves and doors. Pay close attention to the order of steps, as this ensures a smooth and secure assembly. The instructions may also provide tips and techniques for specific tasks, such as using wood glue for stronger joints or pre-drilling holes to prevent splitting. As you proceed through the steps, take your time and be meticulous. Carefully align the panels, ensure screws are driven straight and tight, and double-check that everything fits together properly. Remember, patience and precision are key to achieving a professional-looking finish. If you encounter any difficulties or have questions, don’t hesitate to refer back to the instructions or consult the manufacturer’s resources. You can often find helpful videos or online forums that address common assembly issues. By following the step-by-step guide diligently, you’ll be able to assemble your RTA cabinets with confidence and achieve a satisfying outcome.
RTA Cabinet Assembly Instructions⁚ Tips for Success
Assembling RTA cabinets can be a rewarding experience, leading to a customized and functional kitchen or bathroom space. While following the step-by-step instructions is crucial, incorporating these tips can enhance your success and ensure a satisfying outcome⁚
- Prepare a dedicated workspace. Clear a spacious area free from distractions and clutter. A well-lit and organized space will make the assembly process much smoother.
- Gather your tools. Before you start, have all the necessary tools at hand, including a screwdriver, drill, tape measure, level, and pencil. Ensure the drill has the appropriate bits for the screws used in your cabinets.
- Read the instructions carefully. Fully understand each step before you begin. Take your time and don’t rush the process. Be aware of any specific techniques or warnings outlined in the instructions.
- Inspect the components. Make sure all parts are present and undamaged before starting assembly. Double-check the hardware and ensure you have all the screws, hinges, and other necessary components.
- Use wood glue. Wood glue can significantly strengthen joints and create a more durable cabinet. Apply glue sparingly and ensure it’s evenly distributed across the surfaces.
By following these tips, you’ll enhance your assembly experience and maximize the chances of creating beautiful and functional RTA cabinets.
RTA Cabinet Assembly Instructions⁚ Troubleshooting
Even with detailed RTA cabinet assembly instructions, occasional hiccups or unexpected issues can arise. Here are some common problems and solutions to help you navigate any challenges during the assembly process⁚
- Missing or damaged parts⁚ Double-check the packaging for any missing or damaged components. Contact the manufacturer or retailer immediately if any parts are missing or unusable. They can typically provide replacements.
- Difficult-to-align panels⁚ If panels don’t align smoothly, carefully review the instructions to ensure you are following the correct steps and using the appropriate hardware. A gentle tap with a rubber mallet may help align panels.
- Loose or wobbly joints⁚ Ensure that all screws are fully tightened and that the glue has had sufficient time to dry before applying pressure to the joints. If necessary, reinforce the joints with additional screws or glue.
- Door or drawer alignment issues⁚ If doors or drawers don’t align properly, adjust the hinges or drawer slides to ensure they are properly fitted and functioning smoothly.
- Difficulty with specialized features⁚ If you encounter difficulties with features like lazy susan mechanisms, drawer slides, or complex hardware, refer to the manufacturer’s instructions or contact their customer service for assistance.
Remember, patience and meticulous attention to detail are key to successfully overcoming any assembly challenges. Don’t hesitate to seek help from the manufacturer or a skilled DIYer if you encounter any problems you can’t resolve on your own.
RTA Cabinet Assembly Instructions⁚ Common Questions
As you delve into the world of RTA cabinet assembly, you’ll likely encounter some recurring questions. Here are a few commonly asked inquiries and their answers to help you navigate the process⁚
- “Do RTA cabinets come with instructions?” Absolutely! Most RTA cabinets come with detailed assembly instructions, typically in PDF format. These instructions provide step-by-step guidance, illustrations, and hardware lists to make the process smoother.
- “Should I use wood glue on RTA cabinets?” While not always mandatory, using wood glue is often recommended to enhance the strength and stability of the joints. It creates a more permanent bond and helps prevent future loosening.
- “What tools do I need to assemble RTA cabinets?” You’ll primarily need a drill, screwdriver, tape measure, level, and a rubber mallet. Additional tools may be needed for specific features, as outlined in the instructions.
- “What if I encounter difficulty during assembly?” Don’t fret! Many manufacturers offer customer support services to assist with assembly questions. You can also find helpful online tutorials or consult a skilled DIYer for guidance.
- “Are RTA cabinets difficult to assemble?” While some may seem intimidating, most RTA cabinets are designed for easy assembly with clear instructions and straightforward hardware. With patience and attention to detail, you can successfully assemble your cabinets.
Remember, RTA cabinets offer a cost-effective and rewarding DIY project. By carefully following the instructions and seeking help when needed, you can confidently assemble your cabinets and enjoy a beautiful, personalized space.
RTA Cabinet Assembly Instructions⁚ Resources
Navigating the world of RTA cabinet assembly can be made easier with the right resources. Here are some valuable tools and avenues to aid you throughout the process⁚
- Manufacturer Websites⁚ Many RTA cabinet manufacturers provide comprehensive assembly instructions, often in PDF format, directly on their websites. These instructions are tailored specifically to their cabinet lines and include detailed steps, diagrams, and hardware lists.
- Online Tutorials⁚ YouTube and other video-sharing platforms offer a wealth of tutorials on assembling RTA cabinets. These videos demonstrate step-by-step processes and provide valuable tips and tricks for a smoother assembly experience.
- DIY Forums⁚ Online forums dedicated to DIY projects and home improvement often have threads specifically about RTA cabinets. Here, you can connect with fellow enthusiasts, share experiences, ask questions, and find solutions to common assembly challenges.
- Home Improvement Stores⁚ Local home improvement stores can be a great resource for finding tools and materials needed for RTA cabinet assembly. Their staff may also offer advice and guidance on specific assembly steps or recommend helpful products.
- Professional Contractors⁚ If you encounter significant difficulties or prefer professional assistance, consider contacting a licensed contractor specializing in cabinet installation. They can provide expert guidance and ensure a safe and successful assembly process.
Remember, gathering information from multiple sources and utilizing these resources can significantly enhance your RTA cabinet assembly journey, making it more enjoyable and successful.
RTA Cabinet Assembly Instructions⁚ Conclusion
Assembling RTA cabinets can be a rewarding project, offering the satisfaction of creating a personalized space while saving on costs compared to custom cabinetry. While the process may initially seem daunting, by following these steps and utilizing available resources, you can successfully assemble your RTA cabinets.
Remember, patience and attention to detail are crucial. Take your time, carefully review the instructions, and don’t hesitate to seek help if needed. By investing time and effort, you can achieve a beautiful and functional kitchen or bathroom space that reflects your individual style and needs.
Whether you’re a seasoned DIY enthusiast or a first-time assembler, the world of RTA cabinets offers an accessible and fulfilling way to transform your home. With the right approach and guidance, you can confidently tackle this project and enjoy the fruits of your labor.

RTA Cabinet Assembly Instructions⁚ Additional Information
RTA cabinet assembly instructions often include additional information beyond the step-by-step guide. This supplementary information can be crucial for a successful assembly process, ensuring accurate measurements, proper hardware installation, and a professional-looking finish.
For instance, the instructions may provide detailed diagrams or illustrations that clarify specific assembly techniques or showcase different cabinet components. They might also offer tips on using tools safely and effectively, such as how to operate a drill or secure screws properly.
Additionally, the instructions could highlight potential challenges or common mistakes to avoid during assembly. This foresight allows for a smoother and more efficient process, minimizing the risk of errors or needing to dismantle and reassemble sections.
By carefully reviewing the additional information provided in the RTA cabinet assembly instructions, you can gain valuable insights and ensure a successful and satisfying assembly experience.
RTA Cabinet Assembly Instructions⁚ FAQs
Frequently asked questions about RTA cabinet assembly instructions are common, as people seek to clarify aspects of the process before they begin. Some common questions include⁚ “Do RTA cabinets come with instructions?”, “Should I use wood glue on RTA cabinets?”, and “What are the standard RTA cabinet dimensions?”
The answer to the first question is generally yes. RTA cabinets often come with detailed assembly instructions, either included in the packaging or available for download online. The instructions typically provide step-by-step guidance, diagrams, and hardware lists to ensure a smooth assembly experience.
Regarding the use of wood glue, while not always mandatory, it is often recommended. Wood glue strengthens the joints and creates a more durable and stable cabinet. It helps prevent the cabinet from becoming wobbly or loose over time.
Standard RTA cabinet dimensions vary depending on the manufacturer and style. However, common dimensions for base cabinets are 34.5 inches high (allowing for a 1.5-inch countertop to create a 36-inch height), and 24 inches deep. Wall cabinets, on the other hand, can range in depth from 12 to 24 inches, with a height of 12, 30, or 36 inches.
RTA Cabinet Assembly Instructions⁚ Where to Find Instructions
Finding RTA cabinet assembly instructions is generally straightforward. You can locate them in several places, depending on where you purchased your cabinets. If you bought your cabinets online, the instructions are usually accessible as a PDF file on the manufacturer’s website. The website may have a dedicated section for assembly instructions, often categorized by cabinet line or style.
If you purchased your cabinets from a physical store, they may have provided you with printed assembly instructions. If not, they can likely direct you to the manufacturer’s website for downloadable instructions. Some cabinet manufacturers also offer interactive assembly instructions through apps like BILT, providing a 3D visualization of the process.
If you have lost your instructions or are unable to find them online, contacting the manufacturer directly is a good option. They can often provide you with a copy of the instructions or guide you to the appropriate resources.
As a last resort, you can search online for generic RTA cabinet assembly instructions. Many DIY websites and forums offer helpful guides and videos that can assist you with the assembly process.
0 comments on “rta cabinet assembly instructions pdf”Add yours →